 First you use hill&valley folding to create the creases in your base paper. Size for the base on the shown image is 6"x9". Here's a great side view of the project to show you how all the pieces have been assembled together.
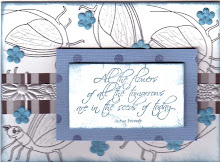
 This project was done using a pattern created by Crafter's Companion and their Ultimate Tool. I used some Stazon ink in white to add floral stamping onto the clear sheet. This paper takes images well and even if you are using stazon ink, if you wipe it off quickly, you can repeat your stamp image if there is a smudge the first time. It's wonderful!! Be sure to let the ink dry for a short period of time before touching it.
Once stamped, I used some clear dots to adhere to clear sheet to my black cardstock. Here's an image of the black cardstock with everything attached to it before I add the clear sheet:
 Once I added the clear sheet (which is sized at 6" x 11.5") I wanted to cover the glue dots that I used to adhere it to my card. To do this I used some Sky blue crepe paper. Seems like a tiny piece of paper to need, but I keep ALL scraps from every project. When a project like this comes along, I go through all my scraps by length and found this wonderful ruche paper which fit perfectly! So save all your paper scraps for projects just like this!! I needed a 1.5" size of Ruche and an even tinier sliver of silver! (Sliver of silver...now say that 5 times fast!) Here's a much better image that shows the Sky Blue crepe paper:
This image also shows how wonderfully the clear paper takes the white stazon ink. Finally, here's an image of one of the embellishment butterflies

Hope this project has inspired you today! It sure makes me love paper.
If you are continuing along the Scrapbook Place Blog hop today, then it's time to go to Jinky's blog, CLICK HERE! If you want to go to the beginning of the Scrapbook Place Blog Hop then CLICK HERE to go to Lindsy's Blog!
I also have some wonderful Blog candy going on--sign up by leaving a comment on the May 13th posting (CLICK HERE to go the the May 13th posting). If you see your name as a winner, then email me your address so I can send your prize, htondre@aol.com
I am also going to pick a winner from those people who leave a comment here today, so leave a comment on this posting, winner will be announced tomorrow evening so that everyone has enough time to do the blog hop!
Cheers, Holley
Project Materials: Paper (Paper Temptress-see the list at the beginning of the posting); Rubber Stamps (SWALK-Crafter's Companion); Ultimate Tool (Crafter's Companion); Punch (Fiskars); Butterflies(); Ink (Memento, Stazon); Flowers (); Brads (Making Memories); Die Cuts (Spellbinders, Nestabilities); Puffy Stickers (Recollections); Color (Copic Markers);


21 comments:
♥♥♥wow! so interesting work! love it, Holley!♥♥♥
I love this type of card, gives it a very nice dimensional look to it that is much deeper than pop dots. I just love the layers for the dimensions as you can do so much more just as you did. I never seen one with the clear over it for sky...what a great idea. That image and the butterflies are so pretty.
Wow, wow, wow!!!!!!!!!!!!!! You are out did your self this time Holley. That is fantastic what you did here.
Hugs Nataliya.
Step cards are fun and impressive. you did a beautiful job of coloring such an adorable little girl dressed up in grown up clothes.
thanks for sharing,
stamping sue
http://stampingsueinconnecticut.blogspot.com/
What a nice surprise, I have never seen a display like this one. Thanks for the tutorial too I appreciate it soooo much!
Cindy H.
This is soo pretty. Thanks for the inspiration.
Hugs
rhonda
It is so beautiful!!!
Very nice blue colouring) The image is cute too)
How adorable. I would love to see this sitting next to me as I'm making cards.
Sue S.
Love your stairstep card but then again ALL of your cards are adorable!
Yes all of your cards are always darling - I've never seen one here I didn't like! Your creativity just rocks Holley!
what a lovely project - I love the colours
what an awsome card..
thanks
Great job Holley, I seen your wonderful project via the Paper Temptress's Blog!
Shell~Alaska♥
This card is really gorgeous. I like the unusual style and the clear overlay--both very different.
I love your work. You've given me incentive to try one of these cards. Debbie F.
What a gorgeous and unique card! I love the use of the clear acetate. Very inspiring! Many hugs, Anna
Wow, what a cool card..and I love the clear cards. You did a great job with it! hugs,T
Beautiful Card!! Love the color and all the dimensions.
VERY beautiful card Holley. I haven't seen a card like this before. There are so many layers to it. Each time I look over it, I see something new.
I love the colors, they all match so nicely. I really like the stamping on the front of the clear, makes a nice addition.
Good job, as always. :)
~Melisa Marie
http://bipolarcrafter.blogspot.com/
I know I'm lagging behind, but had to tell you what a marvelous project this is, Holley!!! It's so beautiful. I really like the blue and black together. A very outstanding creation!
Post a Comment