Now, let's show how the coloring happens to create the wonderful SWALK image on this card. This image is one of the newest SWALK images that is about to be released at the Crafter's Companion store.
I started by stamping the image out onto white paper with some Memento ink in Tuxedo Black. I let the image dry throughly before using my Copic markers. The first color that I like to use is the skin tone that I have chosen. In this image it is E00. (For this tutorial, I will use the color codes written on the Copic Markers.)

 This image adds two additional copic colors, you can see which colors I am adding by looking at the color chart shown on the left hand side. You will notice that the inital layer of color is not done perfectly. It's mostly complete, but not super neat or even. I am just putting in a light layer of the lightest version of the color I want knowing that I am going to be adding additional layers of coloring throughout each step.
Now I am starting to add in additional colors
 on top of the layers that I already have. The wonderful thing about Copic Markers versus typical water based markers is that additional coloring with the same color marker will result in a darker tone and coloring ON TOP of a marker with a different color marker will result in the new marker replacing the current marker color. This will be the case until your paper is saturated with color.
 Now I keep coloring in additional colors
  on top of my current colors. The wonderful things about Copic Markers is they are grouped into color families. Copic does this by numbering their markers. For Example, E33 and E35 are markers that will match together perfectly. They are all part of the E30 family and the last digit is the darkness factor with 0 being lightest and 9 being darkest. Always start coloring with the lightest colors then add in touches with the darker colors. In this case I started with E33 for the hair and added in E35.
 Next I have continue to add in additional darker colors for each color family. Once adding the additional color, I often take the lighter shade and go back over the edging slightly. For example. Look at the SWALKS hair coloring here...you can see the darker shade BUT you can also see that there is no harsh lines as there was in the previous image. This is because I added darker color using marker E37 and then went over the coloring with the E33 to blend the coloring together.
Here's the final image. I added the final touches to my coloring and just a few more highlights including a bit of extra depth in the facial coloring by adding more shading in the skin tones and on the tiny flowers by adding additional coloring to the flowers. Now this image is ready to be cut out and added to my card!
Once the coloring has been completed, to make my final card, I took the colored image and used a Spellbinders die cut to cut it out. The card is comprised of a 6x12 inch paper folded in half from the Crafter's Companion Fairyopolis paper, some wonderful shimmery purple pearlescent paper from the the package, some great corner punches, and cute buttons. I also used a wonderful saying from the same SWALK set as the image shown that says "Daydream Believer".
Here's the finished card again:
Here's the finished card again:
I hope this little tutorial gives you some inspiration for using your copic markers and some ideas behind the work that goes into some of the wonderful cards you see. Have a crafty day!
There's a wonderful drawing going on at the Crafter's Companion Blog!! They are giving away SIX sets of wonderful SWALK stamps. Go to their blog (CLICK HERE) and leave a comment on the Sept 28th posting (look for MY CARD!!) to be eligible. Winner will be announced on Oct 6th.
 Project Materials: Cardstock (DCWV, Bazzil, Neenah); Rubber Stamp (Queen Kat); Ink (Memento); Die Cut (Spellbinders Nestabilities); Ribbon (JoAnns); Adhesives (Pop dots, Ribbon Glue, Glue All); Color (Copic Markers);
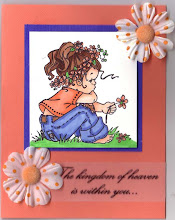
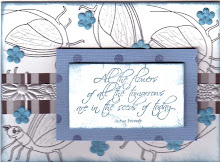
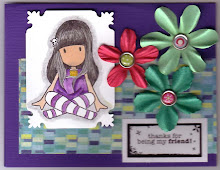
 I cut the outside edge of the card to match the shape of the paisley and let the inside coloring of the cardstock show. I added a wonderful sentiment "The eyes indicate the antiquity of the soul." (Ralph Waldo Emerson) and used a couple of great flower embellishments from All My Memories to add one extra touch. The die cut used on this card is a new shape that Sizzix is selling. Be sure to check out all of Nikki's stamps (
 Project Materials: Cardstock( Bazzil Swiss, Neenah); Stamps (Angel-Mo Manning-Stampavie; Saying-Sweet Pea Stamps); Ink (Memento, Colorbox Chalk); Butterflies (Unknown); Die Cuts (Spellbinders Nestabilities); Adhesives (Pop dots, Glue dots, Glue All); Color (Copic Markers);
 Participate in the Squigglefly challenge this week and be eligible for a prize! Here's a link to the Squigglefly challenge blog,
  Scrapbook stamp society sells digital and clear mount stamps, kits, and other embellishments goodies for projects. They have a gallery full of projects for sharing too!
  Project Materials: Cardstock(Bazzill, California Paper, Neenah); Rubber Stamps (CC Designs); Ink (Memento); Flowers (Prima); Brads (Making Memeries, Basic Grey); Die Cuts (Spellbinders Nestabilities); Color (Copic Markers); Adhesives (Pop dots, Glue all);
 Project Materials: Cardstock (Bazzill, Neenah); Rubber Stamps (The Greeting Farm); Ink (Memento, Colorbox Chalk); Punch (Martha Stewart); Die Cuts (Spellbinders Nestabilities); Lace (Hobby Lobby); Adhesives (Pop dots, Glue All, Glue dots); Color (Copic Markers);
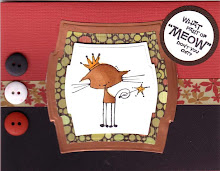
 Project Materials: Cardstock (AC, Bazzill Bling, Neenah); Rubber Stamps (Queen Kat Stamps); Ink (Memento, Colorbox Chalk); Border Punch (EK Sucess); Die Cuts (Spellbinders Nestabilities); Color (Copic Markers); Adhesives (Pop dots, Glue All);
 Project Materials: Cardstock (Bazzil, Neenah); Rubber Stamp (Sweet Pea Stamps); Ink (Memento, Colorbox Chalk); Flowers (Prima); Brads (Making Memories, Queen&Co); Bling (); Color (Copic Markers); Adhesives (Pop dots, Glue All, Glue Dots);
 Project Materials: Cardstock (Bazzill Swiss, Bazzill, Neenah); Rubber Stamps (Kraftin' Kimmie); Ink (Memento, Colorbox Chalk); Brads (Making Memories); Die Cuts (Spellbinders Nestabilities); Corner Punch (Creative Memories); Color (Copic Markers); Adhesives (Pop dots, Glue All);
 Project Materials: Cardstock (Bazzill, Neenah); Rubber Stamps (Some Odd Girl); Ink (Memento); Die Cut (Spellbinders Nestabilities); Buttons (Grandma's Button Bag); Color (Copic Markers); Adhesives (Pop dots, Glue All, Glue Dots);
 Project Materials: Cardstock (Bazzill, Neenah); Stamps (Queen Kat); Ink (Memento, Colorbox Chalk); Flowers (Prima); Die Cuts (Spellbinders Nestabilities); Adhesives (Pop dots, Glue dots, Glue All); Color (Copic Markers);
 They also sell rubber stamps and other great embellishments. Check out their Scrapbook Stamp Society website!
 Project Materials: Cardstock (Archivers, Neenah, AC); Ink (Memento, Colorbox Chalk); Rubber Stamps (Queen Kat Stamps); Border Punch (Martha Stewart); Tiny Buttons (Grandma's Button Bag); Adhesives (Glue dots, Glue All); Color (Copic Markers);
 I added some wonderful wire based ribbon with eyelets in it that I bought while visiting Turkey. To match I added some great matte style buttons and put a saying from
 Be sure to go to the
 They also have a great group on Facebook called "Addicted-To-Stamps" (
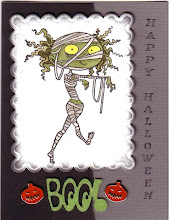
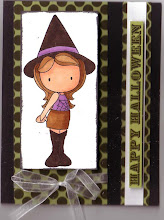
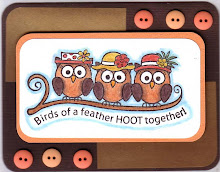
 Have I made you want to go trick-or-treating yet?
 The beautiful lace is more of the wonderful stuff that I got while in Turkiye. YUM! Believe it or not, you still haven't seen all of my stash! I had such a wonderful time spending several weeks in Istanbul.
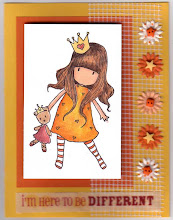
 I love the color of pinks I used on this image, but the scanner Ihave so makes one of the pinks completely wash out when I scanned this card...
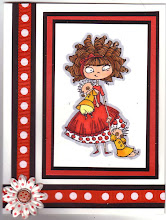
 I colored her up in a hot red dress and added some stunning ribbon from Turkey that is embroidered and has wonderful sequins sewn into it. Then I added some great felted paisley embellishments that black with red stitching. Finally I added a great saying "You rock my world." from Plate #15. The adorable embossed cutout that I used for the saying is one of the newer Spellbinders Nestabilities. Do you think my husband will get the message from this creation?
 Happy Labor day everyone! I hope that most of you are enjoying the day off with your family and those of you who have to work to serve the rest of us on Labor Day, I hope you get a bonus day off at some point this week. I used to be a waitress for years, so I know what "holidays" mean to the those who don't get them!
 Be sure to stop by the
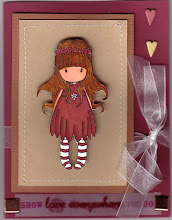
  I love her because her face just has some real attitude. I like a stamp with some real character in it. I added some great flowers from Prima decorated with skulls, some fun brads with skulls on them, beautiful ribbon that I got in Turkey and a wonderful stamped saying from
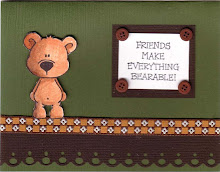
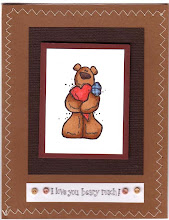
  I colored this bear up with Copic markers on Neenah white paper. The bear and the saying on this card come from a set called "Floral Delight" (

 Right now Queen Kat is having a wonderful stamp sale, be sure to check out all the Heidi Drake stamps! The papers used on this card are some beautiful Mica cardstock that is shimmery purple color called